
- Pruner
- Hex key (or another tool to disassemble the pruner)
- File (like this 8'' Flat Hand Metal File on Amazon)
- Whetstone (alternative to a file)
- Clamp (or vice)
- WD40 or all-purpose oil (optional)
- Scotch-Brite (optional)
- Work gloves (like this pair of HANDLANDY Work Gloves on Amazon from $9.80)
If you want to get great cutting performance out of your best pruners, you’ll need to sharpen the blades regularly.
Not every gardener sharpens their pruning shears—but we all should, at least once per season. Cutting plant stems and tree branches wears down the edge of these tools, causing a gradual decline in performance. As the blades get blunt, they become less effective at pruning, leading to increased effort and messier cuts that may harm plant health.
Thankfully, most pruners can be sharpened at home to restore their cutting edge— provided you use a careful approach. In this guide, I’ll take you through a six-step process to sharpen a bypass pruner—one of the most common pruning shears.
You should handle the blades of your pruner very carefully throughout sharpening. If it can cut a branch, it can injure a person.

Jonathan Reid is a scissors-maker and media personality. As a ‘putter’ at Ernest Wright, a brand specializing in handmade scissors and shears, Jonathan is a leading expert in crafting and hand-sharpening cutting tools. He regularly appears as an expert on the BBC’s ‘Repair Shop’ programme, and serves as a trustee of the Heritage Crafts Association.
Ernest Wright hand-crafts scissors and shears for customers worldwide, and is currently working to add a vintage pruner design to its range.
Sharpening a pruner is a specialist task, so I spoke to a true expert about how to do it properly.
Jonathan Reid is one of the world’s best makers of traditional scissors and shears, with years of experience crafting and sharpening tools for Ernest Wright, a heritage manufacturer in Sheffield, England.
Jonathan will provide his advice on sharpening pruning shears without damaging the blades as we walk through each step.
How to sharpen a pruner: quick steps
- Assess and prepare your pruner
- Take apart the pruner (if possible)
- Identify the cutting edge
- Sharpen the bezel
- Oil between the blades
- Reassemble the pruner
How to sharpen a pruner: Step by step guide
1. Assess and prepare your pruner

Before you start sharpening your pruner, consider its type. The advice in this article relates mainly to bypass pruners—such as the Gardena 8857-81 shown in the photos.
If you have an alternative type of pruner, such as an anvil pruner or snips, you’ll need to follow a slightly different sharpening process.
Also, consider whether you can take apart your pruner. Can you access the fastening that joins the two halves of the tool together? You’ll need a compatible tool to loosen this.
If you’re ready to sharpen your pruner, start by cleaning the blades thoroughly. This will ensure you can see and access the cutting edge.
2. Take apart the pruner (if possible)

Most pruner models need to be taken apart before sharpening.
Use a compatible tool to loosen and uninstall the screw that connects the two halves of the pruner. I needed two hex keys, one on either side of the fixing. Some pruners, such as the Felco 6, are sold with an adjustment key for uninstalling or reinstalling their fixing.
Also, remove the spring mechanism from between the pruner’s shanks (if it has one) and store the component where it can’t roll away.
“Many pruners are spring-loaded so that after cutting into something, they open up by themselves,” says Jonathan Reid, a scissors-maker at Ernest Wright.
“On most pruners, it’s easy to tell what type of spring is used and where that spring is. The visible types of springs tend to be volute or compression springs—the typical helical-looking springs.
“However, some springs aren’t visible until the two halves of the pruner have been taken apart. Oftentimes, these are torsion springs, which can be fiddly to put back in when re-assembling, so be certain you remember where the spring sat when the pruner was originally together,” he says.
3. Identify the cutting edge

You should sharpen only one part of your bypass pruner: the outer edge of the upper blade.
“In a bypass pruner, like in a pair of scissors, one or both of the blades are hollow-ground, slightly curved, and slightly twisted,” says Jonathan.
“Consumer-grade tools (like your hand file or whetstone) can’t reapply these subtle shapes, so it is crucial that no sharpening takes place on the inside of the blade. It can lead to the inside faces of the blades, rather than the blades’ edges, rubbing against each other.”
So, you need to identify the blade's edge that needs sharpening. It will be on the top blade of the pruner, which is the blade that does most of the cutting. On the outside of that blade you will see an angled edge, which is called a ‘bevel’. That’s the part you’ll sharpen.
“You’ll find that on a blunt pruner, the bevel is rounded at the blade’s edge,” Jonathan explains.
“We're looking to sharpen this, and we only sharpen the bevel from the outside of the blade, not the inside.”
The hooked bottom blade of your bypass pruner shouldn’t need any sharpening.
4. Sharpen the bevel
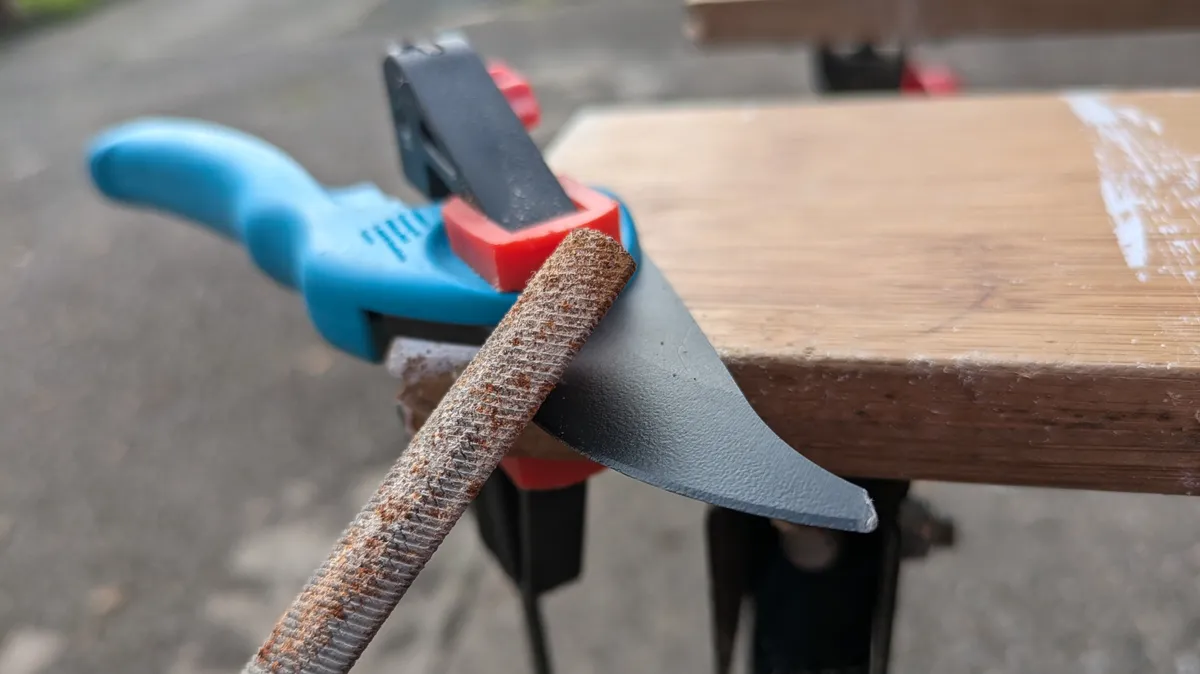
Once you’ve identified the bevel on your pruner blade, use a clamp to secure the tool to a stable work surface, such as a joiner’s bench. You can now start sharpening, at last!
“Run a whetstone or file at the existing angle of the bevel, following the shape of the blade,” says Jonathan.
“The aim here is that you’re filing away the surface of the metal to the point where the bevel creates a sharp edge where it meets the inside blade.”
Once you’re happy that the bevel is sharp, stop sharpening.
5. Oil between the blades (if necessary)

While your pruner is disassembled, you may notice signs of wear between the blades. Now would be a good time to address the issue.
“If you can see any signs of rubbing where the blades pivot around each other, I’d recommend applying some oil,” says Jonathan.
“And if any rust has built up, put some multi-purpose oil or WD40 on the rust, then rub it with some Scotch Brite. This does a good job of removing the rust and lubricating the blades.”
6. Re-assemble the pruner

You can now reassemble your pruner, confident that you’ve done a great job for both it and your plants.
Reinstall the fixing between the pruner's two halves and load the spring mechanism back into its housing between the blades.
If you tighten the fixing too much, the pruner may become stiff, while if you don’t tighten the fixing enough, the tool will not cut effectively. Tweak the tightness until the pruner opens and closes like it did before sharpening.
Final thoughts
Many of us are wary of disassembling our tools or other household items. Once something is in pieces, it can be hard to put back together again.
I count myself among this maintenance-averse demographic, but I'm happy to say that taking apart my pruner for sharpening has only improved the tool, which now cuts just like new.
If you're worried about disassembling your pruner before sharpening, consider buying an easy-to-maintain model like the Felco 8.
How to sharpen a pruner: FAQs
How can I keep my pruner in good condition between sharpenings?
It’s good practice to clean pruning shears after every use, as this prevents dirt from accumulating on the blades—a key cause of impaired pruning performance.
“You should regularly wipe or clean your pruner to ensure any sap or plant residue has been removed,” says Whitby & Co’s Phil Ellwood.
“Afterwards, thoroughly dry them to avoid any rust developing.”
It's also advisable to store your pruner in a dry, well-ventilated place between uses.

Phil Ellwood is Managing Director of Whitby & Co., a retailer of quality outdoor goods, and the UK importer of the highly rated Opinel Hand Pruning Shears.
How does cutting technique affect pruner sharpness?
How you use your pruner will greatly contribute to the rate at which its cutting edge is blunted. In particular, avoid using the pruner to cut manmade materials, and don’t use it to prune branches or stems that are wider than the advertised cutting capacity.
A good pruning technique can also help keep your pruner sharp for longer, as it should ensure you don’t apply excessive force to the blades.
“Make sure your hands are near the top of the handles, on the narrower part,” says Phil.
“This will be the best way to control and hold the secateurs.”
